Related Articles


It’s possible for a laundry room to be problematic. The air smells musty, there is water pooling under the washer, it takes forever for clothes to dry, the shelves are a mess, and the whole area just looks messier and darker than it should be. Seeing these problems, a lot of novices think that they need a professional or a full renovation. Most laundry room problems are simple in cause and solution. Most of them you can solve yourself with a little perseverance, a few simple tools and a well defined strategy.
This manual is for those who have never done laundry room repair or renovation. You will discover how to identify the problem, fix common plumbing and appliance problems, deal with damp and smells, repair floors and walls, organize storage and layout, improve lighting and ventilation, and when to call in a professional. Each step is explained in simple terms, so you can follow along with confidence.
First, figure out what’s actually wrong.
Spend a little time trying to figure out what your real problems are before you pick up an instrument. When you enter the washing room, use your eyes, nose and ears. Look for stains, water marks, peeling paint or dark areas on the walls and ceiling. See if it has a burned or musty smell. “Listen to the machines during a cycle and note any gurgling, screeching or pounding sounds. Check the floor around the washer for moisture and feel the outside of the dryer to see if it is unusually hot.
Write down every thing you see and then put it in three lists. The first bucket are safety concerns, like a burning smell, a leaking hose or an overheating dryer. These are in order of priority. The second category is function problems, such as slow drying, poor draining, or shaking machines. The third category is issues of comfort and appearance, such as clutter, dim lighting and chipped paint. In this order you are secure and your efforts are appreciated.
And get the manuals for the washer and dryer too. If you’ve misplaced them, you can usually find them online by searching the model number printed on the back of the machine or on a label inside the door. Your model has cleaning guidelines and troubleshooting tips in the manuals.
Put safety first
As some repairs involve electricity and water, there are a few safety measures that are important. Always disconnect the washer or dryer before removing it or any panels or opening any panels. If your dryer runs on gas, turn the gas supply valve off before you move the dryer. Do not attempt to disconnect gas lines unless you are qualified to do so. Before working on the hoses, turn off the water supply valves behind the washer.
Wear gloves and sturdy shoes; machines are heavy and have sharp edges. Get a buddy to help you slide them out, and put furniture sliders or a piece of cardboard on the floor to protect it. Even a closed hose will have some liquid in it so keep a towel and small pail ready.
If you smell gas, see sparks, notice burned wiring, or see water around electrical outlets, stop and call in a trained professional. A smart rookie knows his limits and some jobs aren’t worth the risk.
How to fix a dryer that takes too long
Aside from wasting time and money, a dryer that takes two or three cycles to dry a load can be a fire hazard. The most common cause is a blocked lint system. Begin with the lint filter. Remove and wash in warm soapy water to remove the invisible film left by dryer sheets. Be sure to rinse well, and wipe off any visible lint. Let it dry out completely before putting it back.
Then check the vent. Unplug the dryer and pull it out of the wall . Check the duct from the dryer to the wall . If the duct is crushed, kinked or thin foil, replace it with a smooth metal duct that will allow air to flow. Disconnect the duct and clean out the lint with a vacuum and long attachment or a vent brush kit. Then check the external vent cover outside. Check that nothing is preventing the flap from opening easily, such as leaves, bird nests, or snow.
If the vent is clear and the dryer still struggles, look at the way you load the dryer. A very small load could fall into a ball. But over stuffing prevents heated air from moving. Fill drum half to two-thirds full. And, since very wet laundry will take longer to dry, make sure the washer is spinning items efficiently. If everything seems to be working but the dryer does not get hot (or very little heat) contact a repair specialist. It could be a problem with the thermostat or the heating element.
Repair a Leaking or Shaking or Slowly Draining Washer
The reasons for washer problems are often simple. If your washing machine is shaking or moving across the floor during the spin cycle, your machine is probably unbalanced or not level. Make sure the washer is level on all 4 feet. Adjust the Levelling Feet until the washer is steady . Use a tiny level on top of the machine to adjust the levelling feet . Then tighten up the lock nuts. Don’t wash single heavy items, such as a single rug, as this can unbalance the drum. Also make sure that the machine is not touching the wall or other objects.
But before you do anything else, find out where the water on the floor is coming from. Inspect fill hoses under the machine for cracks, bulges or loose fittings. Do not over-tighten joints. Just tighten by hand, then give a slight twist with pliers. Stainless steel braided hoses are cheaper and far more durable than the old rubber hoses. Additionally, check that the drain hose is properly inserted in the sink or standpipe and is not kinked. The door seal of a front loader is often the culprit of leaks in the door area. Clean the door seal and check for tears.
There are a number of reasons your washer may drain slowly. First check the drain tube for kinks. If your model has a drain pump filter, clean it, as lint, buttons and coins tend to collect in it. Before opening the filter, place a shallow basin and towels under it to catch any water spills. If water continues to drain slowly the household drain or standpipe may be partially blocked. You can use a plumbing snake that is made for small drains. Or a plumber can remove this safely.
Get Rid of Mildew and Musty Smells
One of the most common complaints is a musty laundry room. This is usually caused by moisture being trapped. Begin with the washer. Check the detergent drawer, drum and door seal, which are all common places for mould to hide. Run a hot wash cycle with a cup of white vinegar or a washing machine cleaner as instructed in your handbook. Then leave the door open and allow the drum to dry.
Look for the source of moisture in the space. Check for leaks near the ceiling, around pipes and under equipment. If you have a dryer vent that vents into the room instead of out, you are dumping massive amounts of humid air inside and that needs to be corrected. Poor airflow traps moisture too. If there is no ventilation in the room, open a window, turn on the exhaust fan or put in a small dehumidifier.
For mildew on walls, mix a mild dish soap in warm water and scrub the area with a soft brush and let it dry completely. This is great for small areas and mold-resistant paint and primer help reduce returns. If the mould is extensive, recurring or you notice soft or disintegrating drywall, there may be a hidden leak that will require investigation by a professional.
Repair ceilings, walls and trim
Damaged walls not only hide moisture problems, but also signal that the laundry room has been neglected. First, look for soft spots, bubbling paint, and water stains. If the problem is fixed and the area is dry, you can fix the surface yourself. Scrape off any loose or flaking paint with a putty knife. Light spackle can be used for filling in small gaps and cracks, then those areas can be sanded down once dry. Clear the dust and apply a stain-blocking primer. Follow with a washable, moisture-resistant satin or semi-gloss paint.
For larger holes, use a drywall patch kit. Cut out the bad part and put the patch on . Put joint compound on the edges and sand it down when it dries . This takes a few layers so be patient. Replace any baseboards and trim that are bloated or cracked (they often soak up water). Caulk the joints where walls meet counters, sinks and floors to prevent moisture from leaking behind. Best results will be obtained with mildew-resistant caulk.
Light colours make a room feel bigger, and airer. A new paint job is one of the cheapest and most rewarding changes you can make and will instantly improve the ambiance of the space.
Fix the Floor
Laundry rooms can be damaged by heavy machines, spills and leaks. First, check for damage. Look for signs of wear or moisture problems such as soft spots, warped boards, cracked tiles and peeling vinyl. If the floor feels spongy, the subfloor may be damaged so you might want to have it inspected by a professional before you cover it.
You have easy fixes for small problems. To replace a few cracked tiles , carefully chip out the old tile , clean the area and install a new tile using grout and glue . Repair small vinyl tears with a repair kit. Peel and stick vinyl tiles or click-together vinyl planks are easy to install, water resistant, and ideal for beginners who want a full makeover. First, clean and level the surface, measure carefully, and start in the middle of the room for balanced results.
To add an extra layer of security, place a drain pan or water leak sensor under the washer. Put a washable rug or rubber mat in front of the machines to protect the floor and add comfort. Choose rugs with a non-slip backing so you don’t slip and fall.
Solve Storage and Clutter Problems
A messy laundry room is not only unsightly. It hides problems like leaks and makes you slower. First, get rid of all the junk like old boxes, paint cans and tools. Throw out broken items, used up products and empty containers. Organize remaining items by category such as linens, cleaning products, detergents and stain removers.
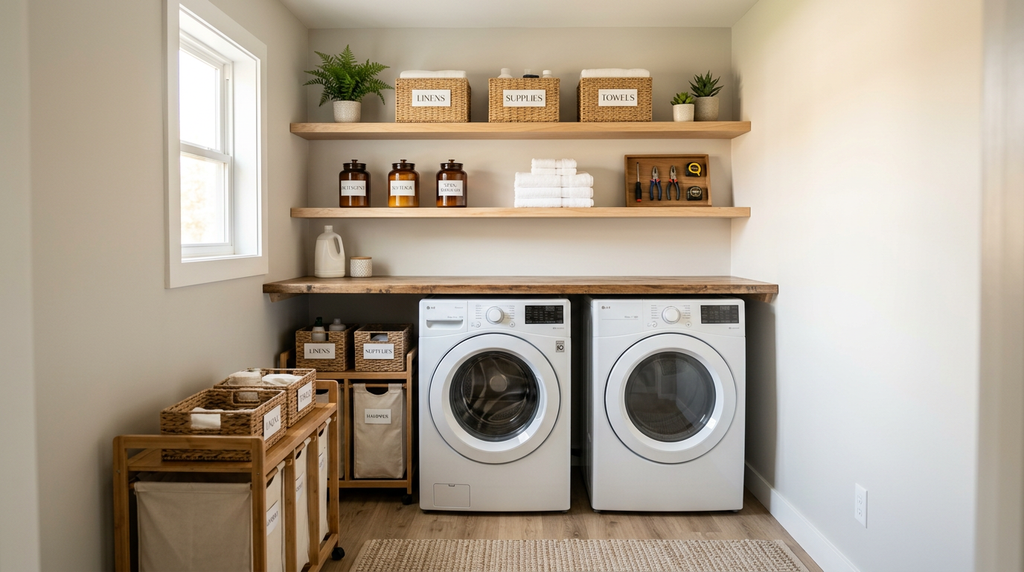
Work the problem in the vertical space. Install cabinets or shelves above the washer and dryer. Be sure they are attached to wall studs. Organize little goods in boxes, jars and baskets. Label them so everyone knows where they belong. Install wall or door hooks for drying racks, ironing boards & laundry bags. A thin rolling cart between the machines and the wall can provide extra storage that you can move for cleaning.
If you don’t have a folding surface, make one. Wall mounted fold down table over top loaders is nice. Countertop across front loading machines is great. You can sort and fold even a small solid table or rolling cart. It makes the room so much nicer if you have a spot for each step of the laundry process.
Increase Air Flow and Lighting
It is difficult to see stains and read labels in low light. Replace that one weak lightbulb in your laundry room with a brighter LED fixture. Add under-shelf lights or a wall-mounted light over the folding area for even coverage. Stick-on or battery operated LED strips are easy to install and don’t need wiring.
Airflow is also critical. If you have an exhaust fan, make sure it’s pulling. If you hold a tissue up to the fan and it doesn’t stick, the fan may need to be cleaned or replaced. Fans collect dust and lint. Unplug or cut the power to the fan and dust the blades and cover. If you do not have a fan, you can hire someone to install a small exhaust fan, or crack open a window or door while doing laundry.
The space looks cleaner and is less likely to develop mould if there is enough light and fresh air. Plus, they make the area more attractive, which encourages you to keep it clean.
Replace Worn Components and Upgrade Basics
Minor changes can solve many of the lingering annoyances. Change the worn rubber washer hoses every few years and replace the shredded foil dryer ducts with smooth metal ones. If the washer outlet box is stiff or rusty, replace it with a box that has shut-off valves. If your system produces a lot of lint, consider a lint trap for the washer drain. Use only a replacement power cord rated for your dryer. If you are unsure, consult an electrician.
Slow draining or dripping from the laundry sink can usually be repaired with a replacement faucet washer or a quick cleaning of the trap. Place a pail underneath the trap, and remove the connections by hand. Clear out the debris. Reassemble carefully and check for leaks. These inexpensive fixes will make your room more reliable and safe from water damage.
Know When to Call a Professional
Repairing a laundry room is knowing what is beyond beginner territory. If your dryer isn’t drying well after you’ve cleaned the vent, you have recurring leaks inside walls, you have electrical or gas line problems, or you have significant mould growth, call a professional. Also, if you find soft or rotten flooring, call someone because structural problems require professional repair.
Appliance repair can be a smart move if you have older devices. Replacement can be more cost-effective if the cost of repairs exceeds roughly half that of a new unit. When selecting a new washer or dryer, get quotes, weigh your alternatives, and take energy efficiency into account. A small investment in expert assistance is preferable to endangering one’s safety or creating more harm.
Prevent Problems Coming Back
Once you get your laundry room organized, a few routines will keep it that way. After each dryer load, clean the lint filter, and once a year, clear the vent. Run a cleaning cycle once a month, clean up spills right away, and leave the washing door open after each usage. When travelling, turn off the water supply valves, and check hoses and connectors every few months. Keep your shelves tidy, and spend some time each week tidying up your items.
Repairs take a lot more time than routine maintenance. A quick monthly inspection of the walls, floor, and machines will identify issues early on.
Typical Errors Novices Should Avoid
A few mistakes keep coming up. Money is wasted when things are purchased without a diagnosis. Devices still plugged in or connected to water pose safety hazards to work on. Hose fittings can crack if you tighten them too much. Painting over mould without addressing the underlying moisture issue will simply result in the mould returning. Using thin foil vent ducts and ignoring the lint build-up increases the risk of fire.
Another common mistake is trying to do it all in one weekend. Start with the most urgent problems and work your way down to the smaller ones. The results are better and less frustrating for the patient.
Conclusions
The main purpose of repairing a laundry room is to resolve issues calmly and methodically. First, identify the problem and make safety your top priority. – Clean out dryer vents – Level and check washer – Moisture and odours – Fix walls and floors – Storage and lighting problems Replace damaged parts, know when to call for help and create simple routines that protect your job.
You don’t need to be an expert to make a real difference. Start with one small repair this week, like tightening a loose hose or cleaning the lint filter and vent, then work your way up. Soon you will find your laundry room a safer, cleaner and far more enjoyable place to do chores.